The Miradouro da Boca do Inferno is the quintessential postcard from the Azores. Bottle-green lakes nestled at the bottom of a volcanic crater, surrounded by lush green vegetation and a crystalline Atlantic Ocean in the background. All you have to do is find out how to actually get there, no small feat as it turns out.
I recently came back from a 10-day trip to the Azores which was nothing short of pure magic. Throughout the trip, we explored four out of the nine islands: Terceira, Faial, Pico, and São Miguel Island. The latter is home to the famous Miradouro da Boca do Inferno.
While I usually refrain from writing anything remotely practical in terms of travel guides, I felt this Miradouro or viewpoint deserved a deviation from my rule. The reason for it being very simple: It took us two tries to find it. Truth be told, we lucked out on the second time and followed someone up the trail who clearly knew where they were going.
A quick search online led me to discover it was not just me who was having difficulty finding this supposedly amazing viewpoint. Simply typing in the viewpoint on Google Maps will not get you there. Trust me, I tried. So this is the fool-proof guide to visiting Miradouro da Boca do Inferno including detailed instructions on how to find it!
Please note: This post contains affiliate links, meaning I may earn a commission if you make a purchase by clicking a link (at no extra cost to you). Learn more.


What is the Miradouro Da Boda Do Inferno
READ BEFORE YOU GO: Detailed 10 Day Azores Itinerary
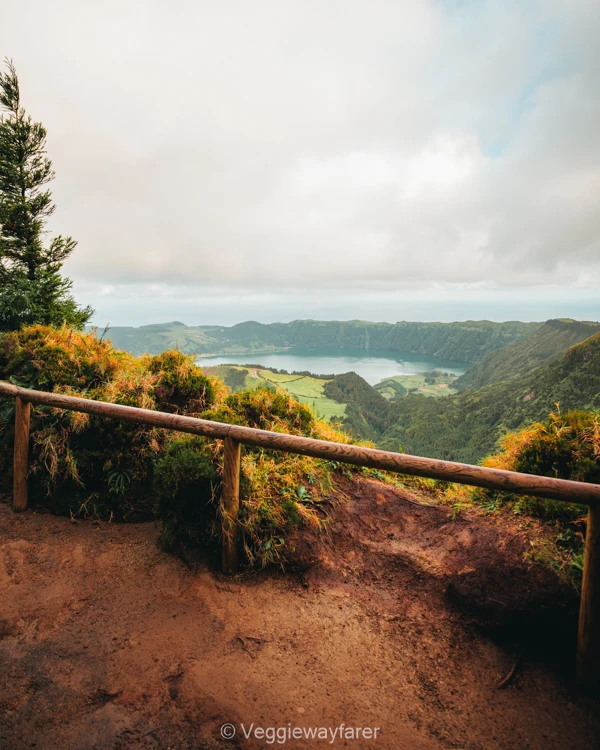
Miradouro da Boca do Inferno, often referred to as the Boca do Inferno Viewpoint or Grota do Inferno Viewpoint is one of the most beautiful viewpoints on São Miguel, the largest island in the Azores. Despite its foreboding name (it literally translates into “Hells Mouth”), this location offers panoramic views of two volcanic crater lakes—Lagoa Azul (Blue Lake) and Lagoa Verde (Green Lake)—nestled in the lush caldera of Sete Cidades.
The viewpoint itself sits atop a ridge created by millennia of volcanic activity, part of the larger caldera that formed after a series of explosive eruptions and subsequent collapses. The terrain is a quintessential summary of the Azores’ volcanic origins, with sheer cliffs, fertile slopes, and a vivid contrast of greens and blues painting the landscape.
Besides its geological allure, Boca do Inferno carries a touch of local folklore. Legend has it that the lakes were formed by the tears of a green-eyed princess and her blue-eyed shepherd lover, forbidden to be together. I bet that got your interest! Now

Driving to the Miradouro Da Boca Do Inferno
GPS COORDINATES VIEWPOINT: 37.8430° N, 25.7633° W
When we wanted to visit the viewpoint I opened Google Maps and simply typed in “Miradouro Da Boca Do Inferno”, blissfully unaware that my tried and trusted app would lead me astray. In fact, we were led to a random strip on the side of the road when it proudly stated “You have arrived at your destination”. We had not, clearly.
The road to the start of the trailhead is fully paved and easy to navigate. Like anywhere on the island, the road tends to twist and bend a lot. If you are prone to suffering from car sickness (like yours truly) make sure to either drive or sit in the front of the car. Here are a few other tips that may come in handy when driving over:
FOLLOW THE SIGNS | If you are coming from Ponta Delgada, simply follow the brown signs with white lettering that read Sete Cidades. This will bring you to the right general direction of the viewpoint.
PARKING | The trailhead starts from the parking lot right in front of Lagoa do Canario. You could punch in the name of this lake into Google Maps. If you zoom into the map, you will notice the small parking indicated. This is where you want to head to. We read online there were two parking lots: A larger one opposite a metal gate leading to the lake (this is where we parked) and one further up, at the foot of the Miradouro. The latter is not visible on Google Maps and not reachable on both occasions we went as the metal gate in front of the road was closed (more on that below).
INTERNET | The internet around Lagao do Canario is very spotty. For both myself and my travel companion it cut out completely. This is where following the roadsigns comes in handy. By the time you hit the dead zone you can follow signs for Lagao do Canario (if you are coming from Ponta Delgada). If you want to head back to Ponta Delgada then make a right turn as you drive off the parking. A few hundred meters away from the parking lot the signal picks up again.
ON THE WAY | There are a few other viewpoints in the vicinity of Miradouro Da Boca Do Inferno that are well worth stopping at. Miradouro do Pico do Carvão and Miradouro da Vista do Rei were my favorite.
PRACTICAL TIP | We opted to rent a car via Discover Cars, they have a comprehensive overview of various types of cars available and make comparing prices easy. Simply book online, and pick up the car directly at the São Miguel airport. Added benefit is their 24/7 support, which we did not end up needing, but always good to have a helpline instead something goes sideways.

Hiking to the Viewpoint
Getting to the Miradouro Da Boca Do Inferno requires a 20-minute, easy hike. It does not require you to be in good physical shape though there is a (very small) stretch that is rather steep, right before you reach the Miradouro itself. This however is only about 200 meters long, so you got this! The path is not wheelchair accessible due to fact there are stairs.


Trailhead
After parking the car in the parking lot in front of the Lagao do Canario, you will need to cross the street. Here you see a green metal gate (pictured above). This gate was closed on both occasions when we visited the viewpoint. You will need to pass the gate though.
At first, I was a little confused about how to get past said metal gate. Being Belgian, we tend to stick to the rules. If something is closed it must mean one should not pass, right? In this case, that does not hold true. In fact if you take a closer look, a well-worn path next to the right pillar of the gate is evidence that many have passed while the gate was shut.
Once past the gate, the first thing your eyes will fall upon is a rust-colored dirt path lined with trees. There is only one path, so getting lost is impossible. Meander down this little path! On your left-hand side you will see a white sign with a red arrow indicating “Lagao do Canario”. Ignore the sign and keep going straight until you hit a bend in the road. The choice is now to either go straight or veer left. You veer left.


Hiking to Miradouro Da Boca Do Inferno
About 100 meters after you have veered left, another white sign with a red arrow pops up. The Lagao do Canario is worth seeing, so if you have time you can always head down this path to take a peek. If not, you continue straight past the sign and keep walking straight.
The next stretch of the hike will take around 10 minutes to complete and will bring you to the foot of the viewpoint. If the abovementioned entrance gate is open at the time of your visit, you can actually drive along this path. As briefly touched upon, there is a small parking lot at the foot of the viewpoint.
The foot of the viewpoint has a smattering of small picnic benches. If you do end up having a picnic here (totally recommend it) please make sure to leave no trace behind! We did not see many trash bins, so bring a little extra bag with you to take your trash back with you.

As you walk past the picnic benches you will see the road splitting (see above). Both roads lead to the viewpoint so you cannot go wrong here. The right leg of the road leads you up a flight of stairs, while the left leg of the road equally leads you up but through an earthen path littered with rocks. Make sure to be careful where you put your feet!
Once you make it to the top, you will catch the first glimpse of the crater lakes – Lagoa Azul (Blue Lake) and Lagoa Verde. This is an excellent spot to take your first snap or catch your breath. From here, turn left and continue hiking up. This is the steepest part of the hike, but fret not it’s only 200 meters!
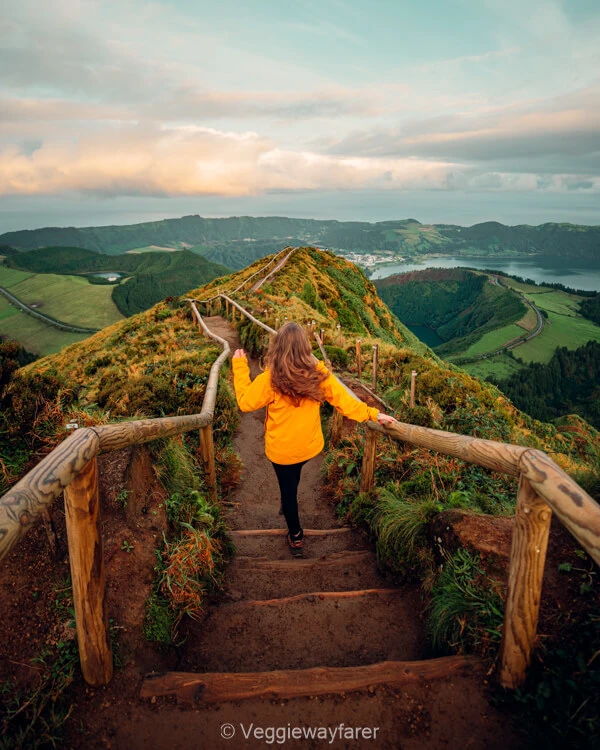
Once you reach the top of the steep section, the view suddenly opens up and you catch your first 360° view of the Miradouro da Boda do Inferno. If the hike did not take your breath away, this will! On your right hand side you will see a set of wooden stairs, take them. These wooden stairs lead to a sort of outcrop overlooking the two lakes.


Have a peek at the drone shot we took (image on the right). On the bottom right you may spot a little white dot, this is in fact where the steep portion of the hike takes you. The two lines running across the ridge if the hill are the wooden stairs leading the the final viewpoint at the very top. The little viewpoint has a sign, explaining the names of the lakes.
WHAT NOT TO DO | I have seen numerous pictures of people posing beyond the wooden fence. Granted, it’s a really nice image but the outcrop is made of dirt and the drop will absolutely kill you. Don’t be that tourist!
Truthfully my favorite view was not from the end of the outcrop. I really liked the top of the wooden stairs and the view that could be found on the left-hand side of the actual viewpoint. When we came for sunset, we saw many people sitting in the grassy planes next to the viewpoint. It’s less crowded and a lot more comfortable.
To reach these planes you will need to take the stairs for about 20 meters, on your left-hand side you will see a small path veering to the left. If you look closely at the top-right image you see a small orange smidge on the bottom right corner of the image. That’s me! And this is where the path leads. The image taken in the header of this article was taken from this very spot. It is considerably safer than taking a picture beyond the railings of the abovementioned viewing platform. Just please be careful as there are no railings here to keep you from tumbling down.

Practical Tips for Visiting Boca do Inferno Viewpoint
CHECK THE WEATHER | Across the Azores, live webcams have been set up to check the weather. Make sure to peek at the Spot Azores website before heading out. Weather can be notoriously fickle, and weather apps have a hard time giving an accurate report.
PATIENCE IS A VIRTUE | The abovementioned weather does not give a fig about your schedule. You might need to come back a handful of times to experience the viewpoint without clouds or shrouded in mist. We went back twice and even then we came back semi-empty-handed as there was a lot of cloud coverage. That being said, the fog can clear up very fast so make sure to hang around for a little bit before throwing in the towel.
SUNSET FOR THE WIN | The very best light on this spot is around sunset. We went both for sunrise and sunset because I had seen pictures online from both times. If you are a photographer and care about might conditions, you will want to aim for sunset. Be aware, this is when most people tend to come so it does get busy.
LEAVE YOUR HEELS AT HOME | You do not need full-blown hiking shoes to get to the viewpoint but you will want to wear proper shoes with a bit of grip. The hike up is easy peasy but you will be traipsing over uneven, sandy ground.
FACILITIES | There are none around the viewpoint. So make sure to bring your own drinks & snacks, and leave no trace behind when you leave. Bathrooms are available by the picnic area between Lagao do Canario and the Miradouro trailhead. However, you might have to look for them as they are poorly signposted.

MORE TRAVEL RESOURCES FOR VISITING THE AZORES
AZORES: 50 Things to do in the Azores
AZORES: 10 Day Azores Itinerary
AZORES: Renting a car on the Azores: Wisdom or Folly?
SAO MIGUEL: 22 Things to do in the São Miguel
FAIAL: The perfect 1-2 day Faial itinerary
PICO: 7 Unmissable things to do in Pico Island
TERCEIRA: 10 Must visit places in Terceira
Visiting Miradouro da Boca do Inferno on São Miguel Island- Pin it


0 Comments